|
Persian 1 into 6 Mail (Expanded 1 into 3)
|
|
Base Pattern
|
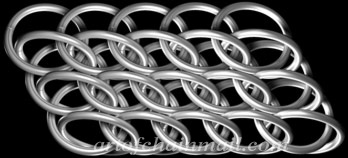 I've only come across one source for these patterns which included some very fuzzy photos and even fuzzier information on how to knit them. In the end it took me about 6 months to figure out how to expand Persian 1 into 3 Chain to this Persian 1 in 6 Mail.
The final results are an absolutely stunning interwoven chainmail pattern. As I've mentioned before the source for these patterns claimed that there were historical examples in a museum somewhere, but until I see these samples in person I will reserve judgment on their historical authenticity. As you can see the natural pattern forms a parallelogram. While not impossible, this adds an extra layer of complexity to forming this pattern into large 3 dimensional pieces like shirts. I'd recommend starting out by using this mail pattern to make gorgeous bracelets and belts. Once you are comfortable with the subtleties of the pattern you can attempt more complicated pieces. As in the instructions for Persian 1 in 3 Chain, steps 3 through 5 are basically identical and are meant to help familiarize you with the pattern. |
|
The ratio of links for this pattern is 1 Closed Link to 1 Opened Link.
|
|
Starting Persian 1 into 6 Mail
|
|
Step 1
|
|

|
|
|
Step 2
Starting to add a row
|
|
 |
 |
|
Step 3
Continuing the row
|
|
 |
 |
|
Step 4
Continuing
|
|
 |

|
|
Step 5
Continuing
|
|
 |
 |
|
Step 6
Ending the row
|
|
 |
 |
|
Finished Persian 1 into 6 Mail
|

|

